


Vlogging is a new thing for me. I started doing it about 6 weeks ago but started planning to do it in the spring. I started by doing a lot of research on YouTube and on the internet in general. The first thing I looked for was a camera to record video. Just using my iPhone XR was an option but I didn't want to rely on just my iPhone.
 Autofocus Is Where It Is At!
After doing my research I went looking for a DSLR camera. I was hoping to go 4K but from my research, I found that 1080p is still a viable option. I found the most important part of the DSLR camera when vlogging was the autofocus feature. It had to work well and be silent. I was also looking for an entry-level camera that I could meet my needs without breaking the bank. I settled on the Canon EOS Rebel SL2 DSLR Camera. I purchased my from Costco in the spring. Mine came with an 18mm-55mm kit lens. The camera is priced at $659.99 right now. I think I was able to get it on sale for $559.99 (or something similar). This camera combined with a couple of 128gb SD cards ($19.99 per card at Costco) and I thought I was ready to go.


What About Sound & Why Are You Shaking?
I started playing with my new DSLR and doing some test videos. The 18mm-55mm kit lens was decent for recording video, except I noticed I was having trouble holding the camera still. The camera lens has built-in image stabilization but for longer duration video I could see the shake from my handheld technique starting to creep in. Without much research and I went and ordered a cheap tripod from Amazon. I ordered the Eocean 54-Inch Selfie Stick Tripod, Extendable Selfie Stick with Wireless Remote. It did the trick, but was pretty lightweight - the quality matched the $31.99 CDN price tag.
A couple of weeks later, I realized that my cheap tripod was Ok, but much better suited for a cellphone. I ended up going to Henry's and purchased in a Cameron VS700 stabilizer with a monopod. It was on sale at the time for about $150 CDN. This is a higher quality alloy monopod that is weighted to provide image stabilization. The counterweights steady the image when you walk around with the camera. It works well but takes time to get balanced when you attach your camera to it. I really wanted a gimble but the pricing for a DSLR gimble was more than I paid for my camera. I will look at getting a gimble at some point in the future.
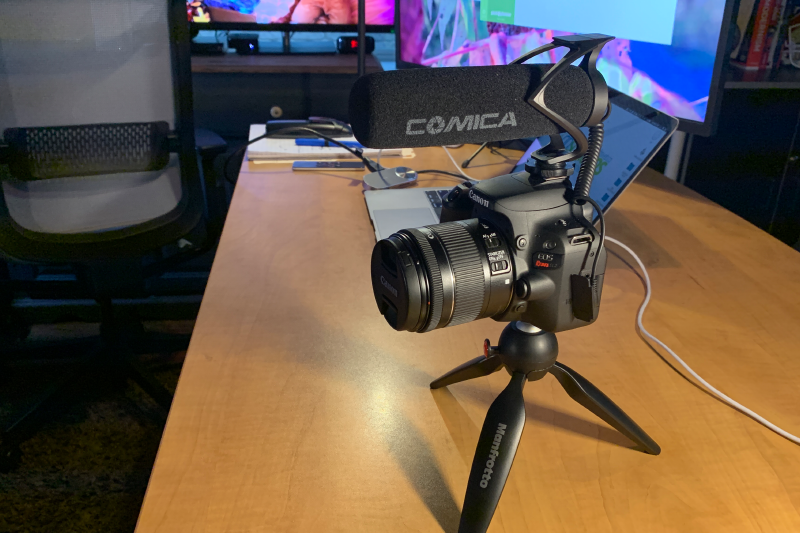
I wasn't done with tripods/monopods yet. I still wanted something I could attach to the camera and use it as a handhold that wasn't bulky and would be easy to travel with. I settled on the Manfrotto MTPIXIEVOBK Pixi EVO Mini Tripod. I purchased this tripod at Best Buy for about $35 CDB. This has been a great purchase. I use this tripod all the time and highly recommend it as a handle option for your DSLR camera.
In fact, I use all 3 tripods when shooting a video for this vlog. I use the Manfrotto as my go-to handheld option as it makes it comfortable to hold the DSLR camera and eliminates the shaking issue I was having before. I use the Cameron VS700 when I shooting in the studio as the main DSLR camera mount and I use the Eocean tripod when I want a second angle with my cell phone as the second camera.
My next issue was sound. The built-in microphone on the Canon camera was ok, but I wanted it to be better. I went back on Amazon and purchased a Comica CVM-V30 LITE Video Microphone Super-Cardioid Condenser On-Camera Shotgun Microphone ($53.26 CDN) for my DSLR. This is the type of microphone that fastens to the top of your DSLR camera. I find using this microphone noticeably improves sound quality.
A Word About Lens
As I mentioned above the Canon EOS Rebel SL2 came with an 18mm-55mm kit lens. I am a complete newbie, so I am still learning the nuances of a different lens. The kit lens seems to be an all-around lens and works well for shooting video. I also use this camera to take stills I use on the blog and on the social media feeds. I was talking to a photographer friend of mine and he suggested I purchase a Canon 50mm lens or a "nifty fifty" as he called it for stills. He was right the 50mm takes really nice still photos. I purchased this lens from Best Buy for $150 CDN. I am still learning so my stills are a definite work in progress. Lastly, I just added a Canon 55mm-250mm lens to my kit. This lens allows me to zoom in from further away if I am shooting outside of the studio. I purchased this refurbished lens from Amazon for $186.94 CDN.


A Couple Of Other Accessories
To round out my kit I purchased a couple of other accessories. I needed a bag to keep everything in so I bought a Lowepro Slingshot Edge 150 from Staples for $70 CDN. The bag is good with lots of padding and compartments for lenses, etc. I don't love the way the strap sits when wearing the bag. Overall, it is a good bag that provides the protection you need for your camera and lenses.
The other accessory I bought was the Peak Design Capture Camera Clip V3 (Silver with Plate). I bought this clip from Amazon for about $106 CDN. This a clip you attached to a backpack strap or belt that makes your camera super accessible when you want to use it without having to hold the camera the whole time. This is a great addition to my kit. I use it when I know I am going to use my camera periodically, but don't want to hold it the whole time or fish it out of my bag every time I want to use it. It is something I use quite a bit.
The last accessory I bought was a Comica CVM-MF2 Outdoor Microphone Furry Windscreen or "dead cat". This is the furry cover you can pull over your microphone if you are outside to combat wind noise. It works well, but has a tendance to "shed". This was another Amazon purchase. It costs about $19 CDN.


The Bottom Line
When I was thinking about starting a blog my initial thought was buying a decent camera. What I didn't realize that I would need some accessories to go with it. I compare to going from a queen-sized bed to a king-sized bed. I am getting a bigger bed! Awesome! Then the reality hits - now I need new sheets, and a new bed frame and I might as well get new pillows, etc, etc. It was a bit of naivety on my part in terms of not completely thinking things through and a bit of being a techno-nerd and wanting to expand my capabilities.
All and all I have spent:
- Camera Body + Kit Lens & 2 SD Cards $634
- Eocean Tripod $32
- Cameron VS700 Stabilizer with monopod $150
- Manfrotto Pixi EVO Mini Tripod $35
- Comica CVM-V30 Lite $53
- Canon 50mm Lens $150
- Canon 55mm-250mm lens (refurbished) $187
- Lowepro Slingshot Edge 150 bag $70
- Peak Design Capture Camera Clip V3 $106
- Comica CVM-MF2 Outdoor Microphone Furry Windscreen $19
Total Costs: $1436 CDN + Tax
As I mentioned above, you can totally shoot the video for your vlog using just your cell phone camera. In fact, a lot of people do that. I was interested in the gear and wanted to make an investment in it. I made some mistakes, tripod-wise, bought some extra lens and extra accessories you don't necessarily need which brought my costs up. Overall I am pretty happy with my kit. I am still learning but feel that I know have gear that I can grow into and use for a long time coming.
Have a suggestion for a topic you would like to see covered on LearnTechGuy.com? Visit our make a suggestion page and we will do our best to honour your request!
Disclaimer: All the opinions are my own and are not the views of any suppliers or manufacturers.